Setup
Examine
Read article
Triggers activate the sensors in your tracking device. When a trigger is active, the device records and, if selected, sends data from the chosen sensor.
You can set each trigger to log data or transmit data.
When all triggers are disabled, the device only records:
To collect acceleration data such as motion, shock, tilt, or rotation, you must enable the relevant triggers.
This page explains the available trigger settings. For advanced configurations, contact our support team: contact us.
Transmissions use more battery power than logging.
Triggers are not alarms. To receive email or SMS notifications, you must set up alarms separately.
Some triggers may not appear on your device. This happens when you do not have permission. Contact your manager or Trusted supplier to request access.
The built‑in accelerometer detects whether the device is moving.
This trigger is useful for tracking asset movement on a map or receiving notifications when an asset starts moving.
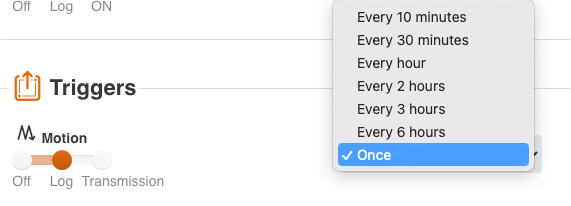
Choose Log to store motion data without sending it immediately.
Select how often the device should log movement.
For example, you can log a position every 10 minutes to create a breadcrumb trail.
If you select Once, the device records a position when movement starts and stops.
By default, the device logs the start and stop time of motion. The standard stop setting activates after 5 minutes without movement.
Set the Motion trigger on transmission to send a position to the server when the tracking device is moving.
Select how often you want a transmission when the device is in motion from the drop down menu.
For example, you can set the trigger to transmit a position every hour when in motion. Keep in mind that frequent transmissions will reduce the battery life time.
The built-in accelerometer registers if the tracking device is tilted or not.
This is a useful sensor if you want to know if, where and when your asset has been tilted and with how many degrees.
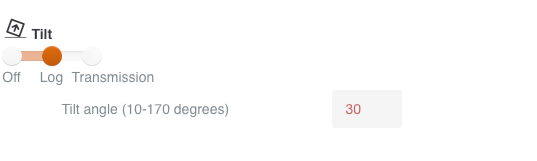
Set the Tilted trigger on log if you want to log tilt data from your device when it has tilted more than a selected degree.
Enter the tilt angle in the grey box. In this case, a log is stored when the device is tilted more than 30 degrees.
Set the Tilt trigger on transmission if you want the data transmitted to the server immediately when the device has been tilted more than a selected degree.
Enter the tilt angle (10-170 degrees) in the grey box.
The built-in accelerometer registers if the tracking device is exposed to a shock, based on G force.
This is a useful sensor if you want to know if, where and when your asset has been exposed to a shock and to which degree.
Set the Shock trigger on log if you want to log shock data from from your device when it is being exposed to a certain degree of G force.
Set the trigger level in the grey box. In the example, all shocks of a level above 3.1 G will be logged on your device.
Defined trigger level can be set between 1,5 G to 8,2 G, but the device can endure much higher G levels.

Set the Shock trigger on transmission if you want the data transmitted to the server immediately when the device has been shock more than a selected G level.
Set the trigger level in the grey box. In the example, all shocks of a level above 3.1 G will be transmitted to the server immediately.
Defined trigger level can be set between 1,5 G to 8,2 G, but the device can endure much higher G levels.
The light sensor is installed behind the two diodes and is evaluating every minute if the device is exposed to light or not.
At every transmission, you will be able to see the minimum and maximum light value since last transmission.
Set the Light trigger on log if you want to evaluate the minimum and maximum light data every second. The trigger level defines the minimum light level that should be evaluated.
Set the Light trigger on transmission if you want the data transmitted to the server immediately when the device is exposed to a light level that is higher than the trigger level which in this example is 15%.

The internal temperature in the device is evaluated every minute.
At every transmission, you will be able to see the minimum and maximum temperature value since last transmission.
If you want more temperature data, then you can use the log or transmission function.
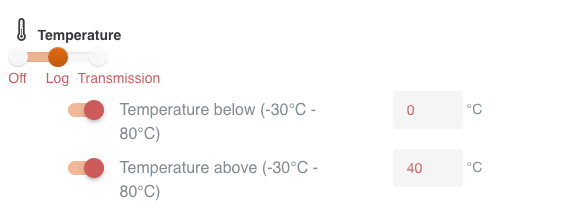
Set the Temperature trigger on log if you want to log temperature data from from your device when it is being exposed to internal temperatures higher or lower than your trigger level.
Enter the temperature lower and higher limit in the grey boxes.
In this example, the device will log data if the temperature moves outside the determined range between 0 and 40 degrees Celsius. You can also choose to set below or above limits only.
Set the Temperature trigger on transmission if you want to the temperature data from from your device to be transmitted to the server immediately when it is being exposed to internal temperatures higher or lower than your trigger level.
Enter the temperature lower and higher limit in the grey boxes. You can also choose to set below or above limits only.
In Trusted RHTP devices, there is a built-in humidity sensor that evaluates the humidity level every minute.
At every transmission, you will be able to see the minimum and maximum humidity value since last transmission.
If you want more humidity data, then you can use the log or transmission function.
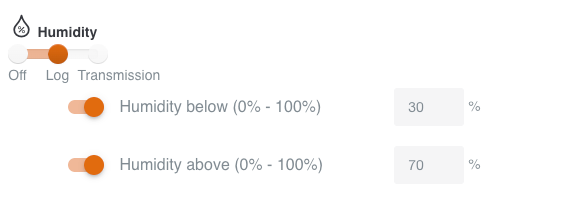
Set the Humidity trigger on log if you want to log humidity data from from your device when it is being exposed to humidity levels higher or lower than your trigger level.
Enter the humidity lower and higher limit in the grey boxes.
In this example, the device will log data if the humidity level moves outside the determined range between 30% and 70%. You can also choose to set below or above limits only.
Set the Humidity trigger on transmission if you want to the humidity data from from your device to be transmitted to the server immediately when it is being exposed to humidity levels higher or lower than your trigger level.
Enter the humidity lower and higher limit in the grey boxes. You can also choose to set below or above limits only.
In Trusted RHTP devices, there is a built-in air pressure sensor that evaluates the air pressure level every minute.
At every transmission, you will be able to see the minimum and maximum air pressure value since last transmission.
If you want more air pressure data, then you can use the log or transmission function.
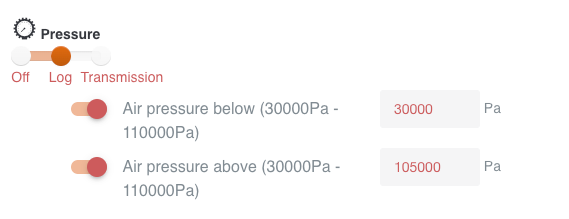
Set the Air pressure trigger on log if you want to log air pressure data from from your device when it is being exposed to air pressure levels higher or lower than your trigger level.
Enter the air pressure lower and higher limit in the grey boxes.
In this example, the device will log data if the air pressure moves outside the determined range between 30000 Pa and 105000 Pa. You can also choose to set below or above limits only.
Set the Air pressure trigger on transmission if you want to the air pressure data from from your device to be transmitted to the server immediately when it is being exposed to air pressure levels higher or lower than your trigger level.
Enter the air pressure lower and higher limit in the grey boxes. You can also choose to set below or above limits only.
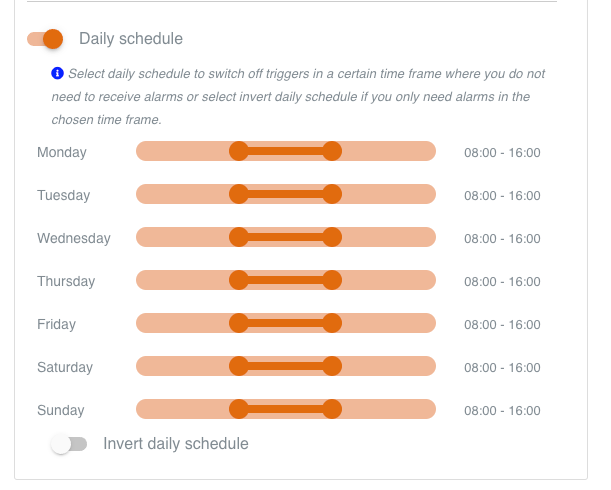
Daily schedule is a feature that enables you to determine a specific daily interval when your triggers should not be active.
This is handy if you only need transmissions and alarms in a chosen time frame. It also has the added benefit of preserving battery life.
An example could be if you would like the device to send a transmission to the server if your asset moves before 8am or after 4pm, but not during these hours.
Enable this feature by switching on the button. Slide the orange buttons in the bar to determine the time frame.
If you click Invert daily schedule, then the trigger will only be active during the times that the orange buttons show – in this example between 8am and 4pm.
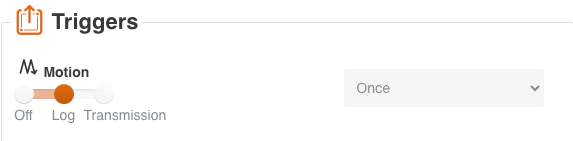
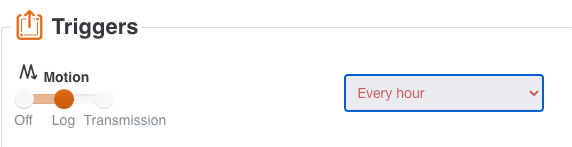
You are able to see if your configurations to the device have been applied or are pending.
The text will be red when a new configuration is pending.
Pending configurations will be applied the next time the device communicates with the server through a scheduled transmission or through a triggered transmission.
In this example, the Motion log was already set to Once. After changing it to Every hour, the text turns red. This configuration is now pending. At next transmission, the configuration will be applied.
If you wish, you can force through configurations by placing a magnet on the Activate with magnet symbol on the device until the left LED starts flashing red. When the LED stops flashing, any new configurations take effect within 15 minutes.
Other articles in this category that might help
Can't find what you're looking for? Our support team is here to help.
Contact Support